
Finish it and make the Photo Sing!
- Oct 18, 2022
- 2 min read
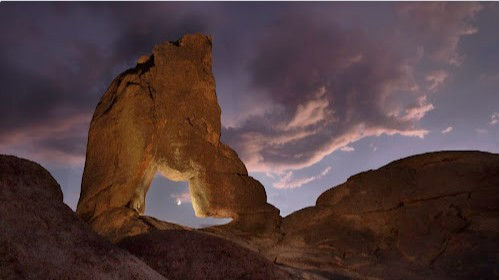
Our digital world gives us so much ability to create, adjust, finish, and go wild with our photographs. For most of my landscape and nature photos I work mainly with color and contrast, a bit of "digital gardening", highlighting and drawing attention to the compositional elements that made me want to press that shutter. The camera will create a nice version of what it thinks you will like, but that will be just a nice average exposure and combination of color across the entire image. This is completely fine if average is OK, but there is so much more that we can do to finish it to our individual vision. Following is an example of finishing an Alaskan fall color landscape - from Camera RAW, to adjustments in Lightroom, and finishing touches in Photoshop. The finished version:

1. Camera RAW from a Canon 5DM4. This file is the "Negative", it contains all the data the camera captured, but straight out of camera it is bland and drab. The camera will make a nice Jpeg file if wished - but I want to take it further.

2. Global Adjustments in Lightroom: I import with a Develop Preset that takes me to pretty close to finished in LR, with adjustments in contrast, highlights, shadows, whites, blacks, vibrance, saturation, texture, dehaze, and the other sliders. I'll do some local adjustments as needed, but mostly, I do global adjustments, and then move to Photoshop.

3. Local Adjustments in Photoshop: The first step is to duplicate the Background Layer so I can go back to it if needed (I can also see the starting point). Then the Healing Brush and or Clone Brush to eliminate any dust goobers. I'll add contrast with Levels and Curves Layers - pulling down the transparency as needed. I'll do some "Digital Gardening" to remove any distracting elements (very few here). Then highlight areas of compositional interest by Burning and Dodging. Additional Curves Layers if needed to lighten/darken areas. I can go deeper with Luminance Masking (sometimes). Add a sharpen and or reduce noise layer and then call it a Master. I learned the hard way to save my Master files with all the significant Layers intact. This file then becomes the template for any future versions of the photo and for high quality jpgs for printing or web gallery sales.

4. Add some Glow, Depending on the photo, sometimes I'll finish it with a bit of Orton Glow. I created an Action so all I need to do is click a button and then adjust to where it feels right. Here, in this file, it's a very subtle finishing touch. Then I'll add a Border and save it as a separate file, ready for Image Competition or to share on FaceBook, Instagram, Vero ... See the finished version at the top!

So - yup, Finishing the photo is a thing, a very good thing!

Comments